How to keep dung worms at home. Earthworm breeding farm. How to feed earthworms
Residents of rural areas always know how to preserve worms for fishing in winter. There is nothing surprising in this, since even in the cold season they can be found in the same manure, which is more than enough in a cowshed or pigsty. Another thing is city residents. It is impossible to find worms under the snow, so you need to stock up on them in advance, and then somehow be able to save them before fishing.
Every fisherman understands that the bait must be elastic and always alive for the fish to pay attention to it. Otherwise, there will be no catch. Some people might think that storing worms for fishing is difficult, but it is not. You can keep the bait in good condition even in a warm apartment. The most important thing is to know some important points.
Many anglers prefer fishing in the summer. Of course, on the one hand, this is very comfortable for humans, but on the other hand, it creates a problem regarding how to preserve earthworms. When exposed to the sun, fertilizer can deteriorate in just a couple of hours, and it is not always possible to get a new one.
First of all, it must be said that dung worms and earthworms cannot be placed in the same box, because they will die. Dung species produce mucus, which negatively affects their rain “brothers”; they, in turn, decompose and kill dung worms.
Therefore, to keep worms for a long time in hot weather, you can use several methods.
Method one (using a canvas mitten)
First, the fisherman must find a mitten, and then pour bait into it along with the earth. The product closes tightly at the top to avoid any unpleasant surprises. Afterwards you will need to place the mitten in the shade of trees or in thick grass. As soon as the air temperature starts to rise, you should lower the glove for a couple of seconds and then return it to its original place. This manipulation allows the top layer to get wet. At the same time, the soil inside the mitten remains dry. When the product begins to dry, the evaporated moisture cools everything inside the glove. Thus, earthen or dung inhabitants continue to be kept in comfortable conditions.
In hot weather, the above manipulation is performed as often as possible.
Second method (using plastic containers)

Surely finding a small bucket made of plastic will not be difficult. As in the previous case, you will need to fill the container with soil (moist, but not wet), and the worms are sent there too. And dry leaves and grass are laid on top. After this, you will need to close the jar with a lid, having previously made holes in it for air, and wrap the container with a damp cloth. By placing the container in the shade, you don’t have to worry that you won’t be able to keep the worms in good condition for a long time.
Third method (using pits)
If a fisherman goes fishing for more than one day, perhaps goes on vacation, but doesn’t want to dig for worms on the spot, then it will be useful for him to learn about one interesting manipulation.
First of all, you need to take a linen bag or handbag (many people use ordinary women's tights). Next, you will need to pour soil, dry leaves and moss into the product, and then moisten it all a little and send the prepared worms there. When going fishing, a person will have to dig a small hole in the shade where this bag will be placed. The top of the product is covered with leaves or branches. If it is very hot outside, you can lightly water the hole. Experienced fishermen note that in this way you can keep the bait for a single week, and nothing will happen to it.
There is another way, but it only works with dung worms. In this case, a bag made of canvas is taken, filled with wet manure, and then a “fish delicacy” is placed there. Having tied the product, it can be tied to any tree branch that can be easily reached while fishing. When the sun begins to shine on the bag, it is sprayed with water. It turns out that, firstly, the bag is well ventilated, secondly, it remains wet, and thirdly, the fisherman does not need to go far for bait.
Storing worms at home: how to do it
Not every fish is caught in bad weather, so if everything was collected, but the trip didn’t work out, then you need to take care to keep worms for fishing at home.
In this case, it all starts with the container. Ideally, if you can find a small plastic or metal basin. Be sure to drill small holes at the bottom. They can range from 0.3 to 0.6 cm. Next, you will need to start filling this basin. For these purposes, you can take 50% household waste, and 50% small straw or hay, as well as some dry leaves.

You might think that at this point the preparations are completed and earthworms for fishing can be stored for as long as possible. This is not so; you should also take care of the “filling”. To do this, the fisherman will need to take crushed eggshells and chalk. After mixing this oxidizing agent, add water at the rate of 1 glass of water per 8 kg of mixture. Afterwards, you need to wait until all the excess water drains through the holes in the basin.
This manipulation of watering is carried out within 7 days.
How to feed "house" worms
Simply creating conditions where worms can be stored well is not enough. It is necessary to take care of their nutrition, otherwise they will die. Such specimens can recycle almost anything. Some people may not know, but worms love paper, so wet wipes are an ideal option. If you don’t have them on hand, peels from various vegetables or finely chopped seeds, as well as coffee and tea leaves will do.
Important! In cases where it is necessary for the worms to be stored longer, shells or chalk should be added twice a month. Without an oxidizing agent, the “fish delicacy” will not live long.
Don’t forget to add water once a week, which can serve as a soil moisturizer. Humidity should be at least 70%. It is very simple to determine: taking a little soil in your palm and trying to squeeze water out of it, one drop should appear. This is an ideal indicator that everything is fine with moisture.
You should not worry that the worms will remain hungry, so there is no need to pour large quantities of food into the basin. All products poured at one time must be processed during the day. If they were found for tomorrow, it means there are too many of them and the number needs to be reduced.
It should be understood that worms grow quite quickly, so if you plan to keep them in a basin for a long time, then after a while you will most likely have to look for another container where you can plant all the individuals.
We describe the most popular methods for catching various types of fish.
How to keep worms in winter
You can’t get worms in winter - all fishermen know this, so you should take care of feeding in the summer. To do this, just before the frost (they are different in different regions, so everyone should adapt to their own climate) dig up worms and put them aside. At the same moment you will need to build a wooden box. You need to understand that it should include about 20 kg of earth. Having dealt with this, you can go collect fallen leaves, with which you will need to cover a third of the box. Everything else is covered with soil. Next, they place the worms in a box and sprinkle them with soil.
Important! There should not be too many worms in the box, otherwise they will soon no longer fit in the box.
Next, you need to wrap the container with a damp cloth and send it to some cool place. It can be anything: a garage, a balcony, an attic, etc. The most important thing is to maintain positive temperatures. Earthworms for fishing should be fed once a day.
When going fishing, you can put the bait along with the ground in a special mitten. To prevent the bait from freezing, it is better to hide it under outer clothing and take it out as needed.
Breeding worms at home. Breeding the Prospector worm in boxes. Obtaining vermicompost by vermicomposting. How do worms reproduce at home? Photo.
Each of us has been familiar with worms since childhood. Those who are disgusted by it simply do not know what kind of “beast” it is. The earthworm is a great worker of the soil.
By breeding worms at home, you can utilize kitchen waste to obtain vermicompost and vermicelli of excellent quality, and use them when growing seedlings and in the garden.
Breeding earthworms at home.
It is possible to breed earthworms at home, but it is not at all cost-effective. The earthworm reproduces slowly, is picky about food, and lives for a short time. Of course, you can work hard and, after a few generations, breed your own breed from an ordinary earthworm, but I didn’t.
Russian professor Anatoly Mikhailovich Igonin managed to breed a special breed of earthworm and called it “Prospector”. This worm, unlike an ordinary earthworm, lives longer, tolerates changes in the type of food well, reproduces quickly - it is completely adapted to human needs.
After scouring the Internet in forums and stores, I found boxes that were suitable for me. They have no extra holes, are strong and fit comfortably into each other. Dimensions 590x360x180mm (My first boxes were smaller, but I was uncomfortable with them.) If you choose very large boxes filled with vermicompost, they will be too heavy.
Minimum set of three boxes.
Boxes for breeding worms at home.
Holes are made in two using a drill (the bottom and all sides along the top edge - see photo).
 Top boxes for keeping worms.
 In the bottom box, holes are made only in all sides along the top edge in one row for ventilation; vermicha will flow into this box. The number of holes depends on the size of the boxes - so that it does not lose strength.
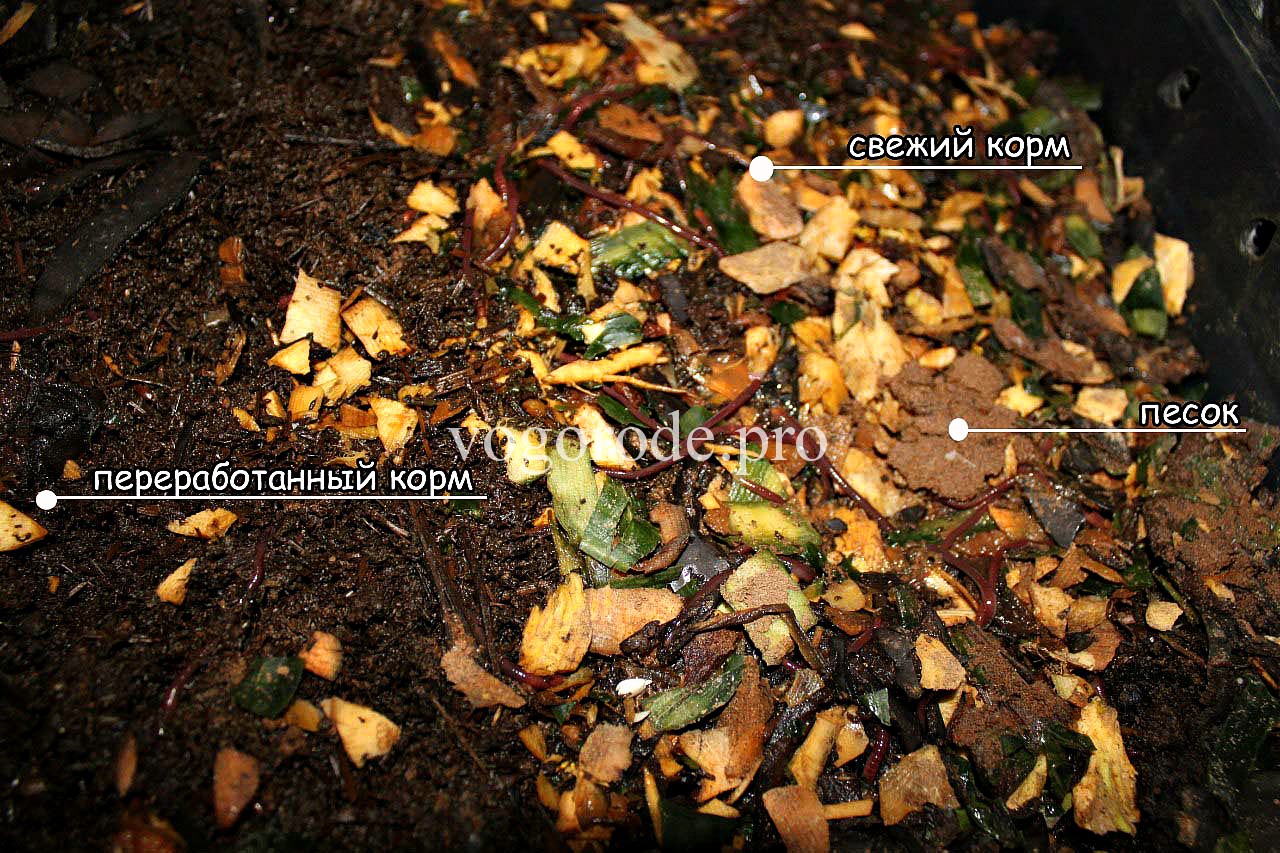
We place one perforated box on the vermicha box. We put food in it and populate it with approximately 1500 - 3000 worms. Close the lid - the worm loves the dark.
Caring for Prospector worms at home.
When the worm eats a layer of food in the box (this will be easily noticeable, the top layer will take on a smooth, loose surface), lay the next 5 cm layer, etc.
 Breeding worms at home. We put food for the worms.
 When the box is full, we place a second one on top, which also has a perforated bottom and sides, into which food is poured, and the worm from the first (lower) box, through the holes, crawls into the second (upper) box for fresh food (in the bottom box all the food is processed and there is nothing to eat).
With each new feeding, I powder the top with a thin layer of sand and a little ash (which has been sitting for a month), or chalk. Sand helps worms digest food, and ash serves to deoxidize and saturate vermicompost with additional microelements. For better, faster processing of feed, I spill each new batch of feed with undiluted vermicelli.
When the second box is filled to the top, we put the third one on top and the worm, in the same way, crawls there through the holes. I always close the top drawer with a lid - the worm does not like light. Thus, up to 5 floors can be accommodated. The optimal temperature for maximum vital activity of the worm is 20° - 25°C. At sub-zero temperatures it goes into hibernation (it can spend the winter outside in a compost heap). Worms live only in organic matter and will not escape from the box.
Obtaining vermicompost.
When, for example, all three boxes are filled with vermicompost and there are no free boxes left, I remove the bottom box with vermicompost, empty it of vermicompost and put it on top of the last one, pour in new food, spill it with vermicompost and close it with a lid. The worms will crawl into it themselves.
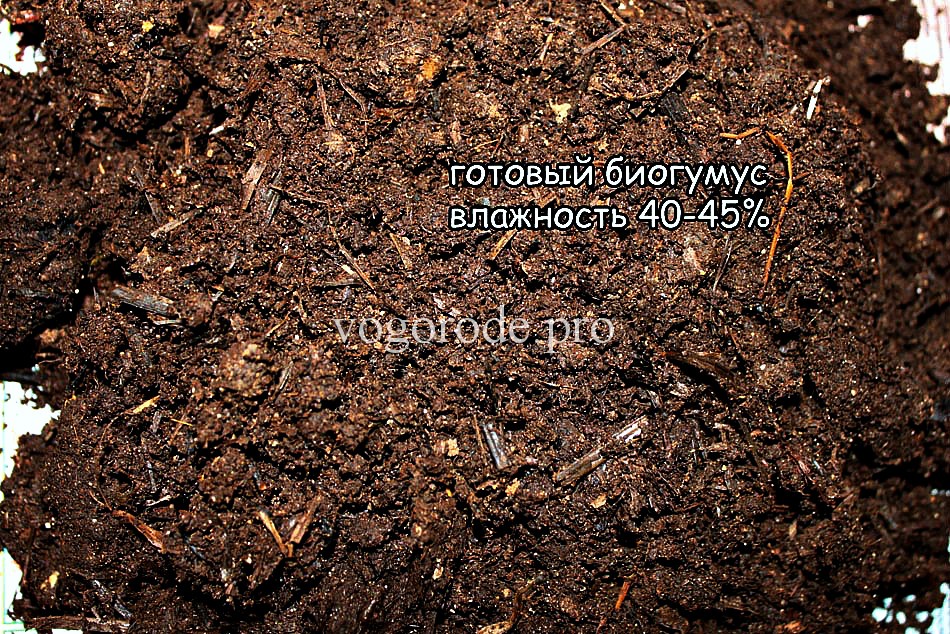 Breeding worms at home. Ready vermicompost.
 I put the finished, raw (raw) vermicompost into a woven plastic bag or into a simple wooden box for subsequent fermentation and readiness. The finished vermicompost takes on a free-flowing appearance. Almost always, some of the worms still remain in the bottom drawer filled with vermicompost. You can simply collect them by hand, or you can leave them in vermicompost.
What to feed worms when breeding at home?
Everyone who gets worms adapts them to their existing food. But first, I recommend asking the seller what the worms ate and adding your food gradually as they are eaten. Worms love a lot of our kitchen waste (this can be various vegetable waste: fruit and vegetable peels, leftover tea leaves, etc.).
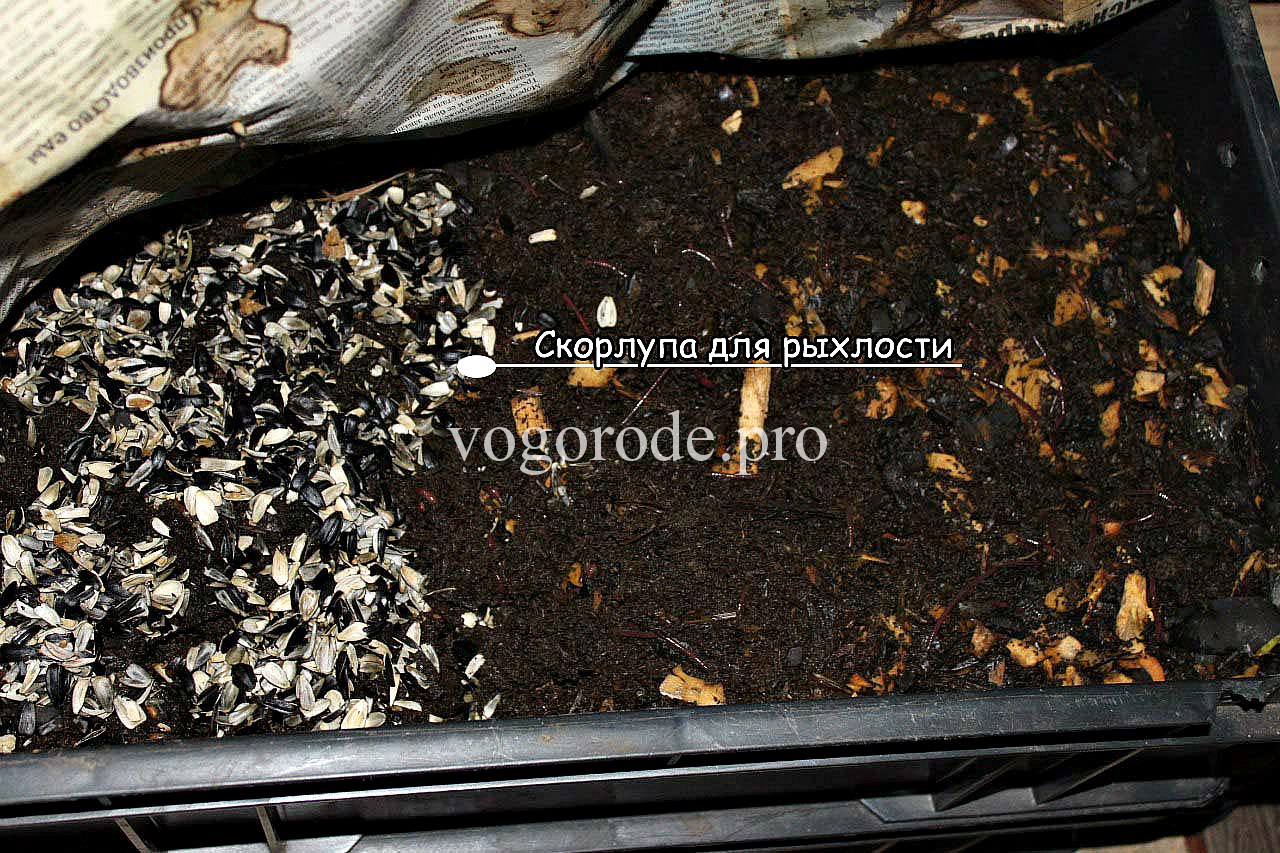
If the food sits there for several days and starts to turn sour, then they obviously didn’t like it and it’s better to remove it. To speed up the process of eating food, I grind it with chops in a wooden trough. But you can also use a meat grinder or simply cut with scissors or a knife. I like to grind in a trough, because I don’t have to wash a bunch of meat grinder parts every time and any waste can easily fit into the trough. If you put waste without shredding, it will take longer to process and may even rot. Sometimes I sprinkle sunflower husks to loosen the substrate so that the vermicompost doesn’t turn sour (just in case 😊)
Breeding worms at home. How do worms reproduce?
If the worm lives happily and eats well, then sooner or later it will begin to reproduce. It lays cocoons - small sand-colored balls. They can be easily noticed.
 Reproduction of worms. The worm lays cocoons - small sand-colored balls.
 Each cocoon contains several eggs, and after 2-3 weeks new worms hatch. And after another 7-12 weeks, these worms are already able to bear offspring. Over time, you understand how your pets live, whether they are dry or damp, when they need to be watered or fed. In any business there are always mistakes and discoveries, and it is impossible to give clear instructions. Each person has their own type of worm food and room temperature. We must be attentive to these little helpers.
When breeding worms at home, we get vermicompost and vermicelli.
Worms create a wonderful vermicompost from a pile of organic matter, with a special pleasant smell familiar to every gardener. The same magical vermicompost that our seedlings and plants in the garden enjoy. The worm, in which colonies of microorganisms live, moves in the soil, processing organic matter. It secretes coprolites (copros - feces, litos - stone) with a large amount of its own intestinal microflora, enzymes, vitamins, and biologically active substances.
They have antibiotic properties and prevent the development of pathogenic (painful) microflora, putrefactive processes, the release of fetid gases, disinfect the soil and give it that same pleasant earthy smell. I will talk about the use of vermicompost for growing seedlings later.
Vermichay is an aqueous extract from vermicompost. It is usually called vermicompost tea or simply vermi tea. It is similar in color to regular strong brewed black tea with a faint soil aroma.
Vermichai is an excellent tonic for all plants, from indoor flowers to fruit-bearing trees. It nourishes, protects from stress and pests, prevents diseases, develops a strong root system and helps to quickly adapt after transplantation.
Getting vermichay.
There are different ways to obtain vermichai - an aqueous extract from vermicompost. I chose the right one for myself. Once every two weeks, I spill water from a watering can for indoor plants in the top drawer. Water gradually passes through all the boxes. Calculation: two liters of water per box. The thicker the layer and the more boxes, the richer the tea. The next day, I pour the tea into bottles and store it in a cool, dark place.
 Most often, I use vermicelli collected over the winter in the garden in the spring.
 I dilute tea with water in a ratio of 1:10 or in its pure form. I know that some people use it for indoor plants, but I don’t practice it myself.
 In the summer I keep worms in a bath in the garden and collect vermicelli in buckets and water (1:10) the entire garden.
 I will talk about this in the next article.
You can read about purchased vermicompost and Vemikofe -
©Alexey Lesnykh (2017)
I will answer your questions in the comments.
In fishing, different baits can be used - both artificial and live. But the dung worm is of particular interest to many fish species. In general, worms for fishing are a universal bait, although it is not always possible to buy them. True, they can be dug up, but only under certain conditions. In case of drought in summer, it is difficult to find a worm, not to mention winter fishing. Therefore, breeding worms for fishing at home may be a suitable choice for fishermen.
Worms loosen the soil
What benefits do worms bring?
It is difficult to overestimate the importance of worms. First of all, it should be noted their importance for increasing soil productivity. Let's look at the functions they perform as part of this task:
- creating fertile soil. In the process of their life, worms pass through themselves all organic residues and process them into humus, on which the fertility of the soil depends;
- loosening the soil;
- ensuring its aeration and moistening;
- soil disinfection - occurs due to the fact that worms, along with the soil, absorb a large number of fungi with their spores, nematodes, bacteria and other pests. By doing this, they not only destroy harmful substances in the soil, but also digest them in order to then release their intestinal microflora. It has an antibiotic effect that prevents pathogenic environments from developing in the soil.
Worms can also be an excellent food for poultry. This is of interest to:
- owners of subsidiary farms raising chickens, turkeys and other poultry;
- pet store owners who can use worms as a feed additive for their pets.
 Worms create fertile soil
 Well, for us the greatest interest is the function of the worm - to act as bait for fishing. One of the most favorite delicacies for almost all types of fish is a dung worm. You need to look for such worms in manure or compressed wet leaves.
By appearance they are difficult to distinguish from ordinary red worms. The only difference is a slightly longer length and an unpleasant odor from the yellowish liquid that is released when the worm is baited. They also differ in their conditions of detention.
Technology for growing worms at home
The question of how to breed worms for fishing involves preparing all the necessary conditions for keeping them at home. It would seem that this could lead to unsanitary conditions in the house. But if you choose the right place and container, and also feed the worms wisely to prevent the appearance of unpleasant odors, then there will be no inconvenience from such a neighborhood.
Worm box
Growing worms for fishing requires a certain container, which can be a plastic, wooden or even cardboard box. If you are running your mini-farm for a long time, i.e. you plan to breed a large number of worms over a long period of time, then choose a plastic box. It is easier to clean and clean, and is also more durable.
If you plan to temporarily rear a small number of individuals, cardboard or wooden boxes are suitable. But you need to understand that the cardboard box will have to be changed often or inserted into another of the same kind, as it will quickly get wet and lose its shape.
In no case should you use metal containers, since metal can, when oxidized, release elements harmful to worms into the soil.
 Growing worms in a box
 The dimensions of the box can be arbitrary, but the main requirements must be met:
- height must be at least 30 cm;
- the area is selected depending on the number of worms per 1000 adult individuals, at least 1 sq. m.
You must also remember to make holes in the box: in the bottom for drainage, and in the sides for air circulation. The more holes there are, the better. The holes must be placed evenly over the entire bottom area. The size of the holes should be small so that even young individuals cannot get out through them and crawl around the apartment. It is better to place the box on a tray with sand. This way, excess moisture will be absorbed and not leak onto the floor or shelving.
An old trough or bathtub, as well as special containers, can be used as an alternative container for living.
Priming
It is recommended to cover the bottom of the prepared container with a small layer (about 5–6 cm) of compacted straw or hay. A ten-centimeter layer of vermicompost should be evenly poured on top. If you do not want to buy vermicompost, you can prepare a suitable substrate yourself. It should include chopped straw and hay, as well as sawdust, manure and soil. All components must be thoroughly mixed and compressed.
 Worm soil
 When collecting soil for the substrate, you need to ensure that no remaining ash from the fire gets into it, because this can be destructive for pets. The presence of fresh humus in the ground will also have a bad effect on the worms. After all, leaves and roots will rot at high temperatures, and at the same time oxygen is taken from the soil. With a lack of oxygen, the worms will not only be unable to develop and reproduce, but also survive.
 Having prepared the soil, you can populate the container with worms
  Worm food
 Many people do not know whether breeding dung worms at home as a business is possible. Let's answer this question simply. Yes, perhaps some farmers are already doing this.
A dung worm is essentially the same as an earthworm, which is also successfully bred by farmers, but has a slightly longer length. Individual individuals in favorable conditions grow up to twelve centimeters or even more. Extremely active and very attractive to almost any fish.
As the name suggests, dung worms live primarily in manure, but they also feel comfortable and give birth in compost.
What to breed in
To start breeding dung worms at home, you will first have to prepare a container. These can be boxes made of any material, with the exception of metal. Many experienced farmers do not recommend allowing metal to come into contact with the environment in which worms live, since it is capable of releasing various harmful oxidation and elements into the soil. Holes are drilled in the bottom of the box for drainage. A layer of sand is poured, it should not be too thick and two to three centimeters will be enough.
Next, the hay is laid down in a layer of about five centimeters and then there is a layer of vermicompost, which you can buy or make yourself. These are necessary and important conditions, the observance of which will allow the worms to adapt more quickly once they find themselves in a new habitat.

Where to get breeding stock
You can buy worms for breeding, or you can do it easier. Drive up to some farm where cows are kept, find a stack of hay or straw and dig up worms.
Feeding
In nature, dung worms feed mainly on rotten vegetation. But if kept at home, they can be fed with kitchen scraps. Potato peelings, various cereals (but not dairy), apples, etc. are suitable. In a word, dung worms are given the same products that are given to other breeds of worms. But there is one difference. For example, if the Californian worm or prospectors are fed simply with crushed food, then dung worms need to be fed with products that are crushed in a blender or meat grinder.

Check-in
Before you transplant the dung worms into the container, be sure to water the soil so that it becomes soft. The water temperature should be room temperature. Representatives of this species love high humidity, so to check whether a given soil is suitable for them or not, take a handful and squeeze - the water should seep out a little.
You need to populate dung worms as follows. Place them in a box on the surface of the ground and wait until they begin to hide. When the last worm is in the ground, pour a three-centimeter layer of food and cover it with a cardboard sheet. Place the box in a warm place.
When you notice holes on the cardboard gnawed by worms, this is a signal that they have already eaten the food you provided and it’s time for another feeding.
We do everything the same as the first time. We lay down the food, water it and cover it with a cardboard sheet. We do this until the box containing the worms is filled to the top.
This video shows how you can keep and breed a worm in an ordinary room.
Despite the huge variety of artificial baits for fishing, nothing can replace real worms. Therefore, anyone who knows a lot about this prefers to always have them at hand. That is why many fishermen ask a logical question: “How to breed worms for fishing yourself?”
Fans of winter fishing know very well how difficult it is to get the necessary bait at this time. It’s good if bloodworms are available for sale. And if it is not there, then you have to use any available food, which does not always guarantee a successful catch. As a result, many people are thinking about how to breed worms for fishing at home.
General information about earthworms
Almost any fish can be caught with this bait. There are several varieties of the mentioned living organisms that are popular among fishermen. How to breed earthworms? How are they different from others? This common name hides a number of families of oligochaete worms. The most common individuals have a body of 3-15 cm. There are worms 2.5-40 cm long. There are 1,500 species, however, the bulk are found in the tropics. There are about 100 species of worms in temperate latitudes. They live in the ground and are active at night. During the day they can be found on the ground after rain. Due to the fact that during their digestion they process organic residues, they obtain the most valuable fertilizer - vermicompost. When thinking about the question of how to breed earthworms, you need to understand the most common types of this fish bait.
Red worms
Many fishermen believe that red worms are the most attractive bait. They are suitable for both industrial and home propagation. At the same time, in a fairly short period of time, you can get a large increase in their biomass. The body of such creatures contains proteins, fats, carbohydrates, and minerals, making them an excellent food not only for fish, but also for domestic animals and birds.
How to breed red worms? There are different ways to grow them. In one cycle, lasting 3 months, up to 30 kg of worms are collected from 1 m2. To feed them, almost any organic waste is used, such as food waste, animal manure, bird droppings, straw, waste from the paper, woodworking, meat and fishing industries.

Habitat conditions for red worms
How to breed worms in the garden? To do this, it is necessary to satisfy their need for nitrogen-containing organic matter. In such an environment, their growth and fertility are greatly enhanced. Sufficient soil moisture is required to grow red worms. If it is below 30-35%, then the development of individuals will be inhibited. If the humidity level drops below 22%, they can die within a week. This is why it is necessary to water the soil regularly. Its optimal humidity is 70-85%.
Soil acidity below pH5 and above pH9 is unsuitable for breeding worms. In such an environment they will die within a week. The best option is soil that has an acidity of pH7. They also cannot tolerate saline soil, and a salt concentration of more than 0.5% is simply lethal for them.
At temperatures below 5 °C, worms do not feed. They crawl deep into the soil and hibernate. As a rule, they wake up 10-14 days before the soil thaws. The optimal temperature for their breeding is 18-24 °C.

Reproduction of red worms
Each adult lays 18-24 cocoons in the summer. They contain from 1 to 20 eggs. After 3 weeks, young individuals appear, and after 7-9 weeks they can already bear offspring themselves. Most often, one individual lives 10-15 years. Moreover, with age their size only increases. Sexually mature young worms weigh about 1 g each.
Growing worms
How to breed dung worms? A sufficient number of individuals are collected in old heaps of humus or in accumulations of rotten last year's foliage. Such worms are not so common in ordinary soil, but they can be found in some places with high humidity (for example, in a raspberry field). Dung worms are very similar to red worms. Only when hooked on a hook do they release yellow contents that have an unpleasant odor.
To create a worm cultivator, you need only about 500 individuals per 1 square meter. m. One of the main factors for the successful reproduction of these organisms is the quality of the substrate in which they will live. It uses manure, straw, hay, sawdust, which are thoroughly mixed. Dense compost creates an ideal environment for worms to live and reproduce. It should remain moist even in dry weather.
Construction of a worm-cultivator
In a shady area of the site, dig a small ditch (no more than 2 m2) with a depth of 30-35 cm. A layer of clay is laid and compacted at its bottom. It should rise to the very edges of the ditch. The thickness of this layer is 10 cm. Good soil (preferably black soil) is poured on top of the clay. Next, the groove is filled with humus, which is thoroughly compacted. You cannot add ash or coal to it, since worms cannot tolerate them.
The collected individuals are poured into the substrate, distributing them evenly throughout the groove. In such a worm house you can grow not only dung or red worms, but also ordinary earthworms or earthworms. For each of these species, the most suitable substrate composition is selected. So, for earthworms and earthworms, you should not add manure to the soil. It's better to limit yourself to compost.
When breeding dung worms in warm winters, they can be collected for fishing even during frosts. How can we explain this phenomenon? This is due to the fact that a large amount of manure in the substrate increases the temperature in it. For the winter, the worm house is covered with bags and sprinkled with earth and snow.

Breeding worms at home
How to breed earthworms at home? Although the vast majority of people breed them in their summer cottage or garden plot, some avid fishermen manage to do this in apartment conditions. True, not everyone succeeds in this, but those who have learned to breed worms in an apartment are provided with good bait all year round.
How to breed worms for fishing at home? To do this, you need to choose the right container to contain them. A wooden or plastic box can serve as housing. As a last resort, you can use a regular canvas bag for this. But worms will not be able to live long in such containers. For long-term breeding, it is better to use enamel dishes, a basin or bucket. Worms will do just fine in an old aquarium.
After choosing a container, they begin to prepare the substrate. It should consist of soil in which there is no or very little humus. The best soil for this purpose is one that has few fallen leaves and grass roots. This is due to the fact that when this organic matter rots, it takes a lot of oxygen from the soil, which is necessary for the normal functioning of the organisms we are considering.

Feeding the worms
Answering the question of how to quickly breed worms, we can say with confidence that the speed of their growth and reproduction depends entirely on the food. Almost any organic waste (peeling vegetables or fruits), unsweetened tea leaves, coffee grounds and boiled or raw oatmeal are suitable for them to eat. It must be remembered that dry food helps reduce the level of moisture in the soil. To increase the rate of reproduction of worms, many advise giving them dairy products. Under no circumstances should you give them potato peelings.
The worms are fed at the following rate: 3 handfuls of cereal per 15 liters of soil. When adding nutrition to the soil, it should not be left on the surface. It is necessary to mix the soil thoroughly by hand. If a “tangle” is discovered, consisting of many individuals intertwined with each other, they must be carefully separated, evenly distributed throughout the entire container. If this is not done, many of the worms will die due to the increased temperature inside such a lump.
Compliance with containment conditions
When thinking about the question of how to properly breed worms, you should not forget about maintaining optimal conditions that ensure the normal functioning of these simple animals. To do this, it is necessary to constantly maintain appropriate humidity. To determine the condition of the soil, it is squeezed in a fist. If a lump forms after it is unclenched, then the humidity is normal. At the same time, we must not forget that excess moisture has an adverse effect on worms.
Despite the fact that these creatures do not like low temperatures, they should not be placed in close proximity to heating devices, as they will quickly die there. The optimal temperature regime for normal development of worms is 17-24 °C. The container is placed in a dark place, away from direct sunlight.
You can contain different types of worms (earthworms, red ones) in one container, but it is better to allocate “separate housing” to each subspecies. When raising these animals using this method, you can collect up to 1 kg of fish bait per week from a 30 liter container.

Growing worms in a summer cottage
How to breed worms for fishing in the country? The simplest way is to dig a small ditch, 30 cm wide. Its depth should be 15-20 cm. Rotting leaves, grass, hay, and humus are placed in the ditch. The top is covered with boards or burlap. After 7-12 days, earthworms will appear in it. A special dwelling is built for them, which is a wooden box on legs with a removable lid. Its minimum size is 100 x 100 cm, and its height is 35-40 cm. A mesh with small cells (0.5 cm) is attached to the bottom of the box.
How to breed worms in the country? To do this, the box is placed in a shady place. It can be placed near the compost pit. About 20-25 cm of compost is poured into the bottom of the box. The worms are moved from the ditch along with a small amount of soil into this new home. The soil is moistened and covered with burlap. After a week, the box is filled to the top with compost and watered again. It is necessary to moisten the substrate 1-2 times a week (depending on the rate of drying).

Reproduction of worms
Over the course of 2-3 months, the worms lay cocoons in the ground. Moreover, each individual produces one cocoon weekly. 5-20 worms appear from it. The last clutch is observed at the end of July. The first offspring appear at the end of August. Already in October the worms become adults. For development and growth, they require a lot of food, so from July to November, a layer of compost with humus 10 cm thick is added to the box twice a month. During the digestion of the worms, vermicompost is obtained from it, which pours out through the mesh bottom of the box. In one season, the layer of accumulated valuable fertilizer can reach 25-30 cm. In winter, the worms' housing is left in place, insulated on top with compost, a layer of 20-30 cm. The sides are covered with earth and sand. When snow falls, a small snowdrift is poured onto the box.
In the spring, vermicompost is collected and used for its intended purpose, and most of the worms are spread around the site. Only a small number of individuals are left in the box for further reproduction.
Recently, fishermen are increasingly using mealworms, often called zoophobus, for bait. In large cities, they can be purchased at pet stores as they are used to feed a variety of animals. Where this is not possible, you can grow them yourself. How to breed mealworms at home?
You should choose a suitable location for their placement and a container for growing them. Large plastic boxes or trays without gaps are suitable for this. A fine mesh mesh is used as a cover. Flour, bran, sawdust, and ground crackers are poured into the bottom of such a container. The nutrient layer should be 2-10 cm. Acquired beetles, whose larvae are zoophobes, are placed in the trays. When using pupae, the breeding process will take longer. The number of beetles depends on the expected result.
After adults lay eggs, it takes 2 months before mealworms hatch. The humidity in the box with them should be about 50%. Worms develop best at a temperature of 26-28 ° C.
The larvae of beetles are omnivorous. Zoophobes are fed once every 2 days. They are given bran, oatmeal mixed with grated carrots, beets, and other vegetables.

Instead of an afterword
We looked at the most common ways to solve the question posed in the title of the article. Of course, it’s easier to buy bait in a store. However, after spending some time arranging the worm house and caring for its inhabitants, you will not lose either. Firstly, breeding worms cannot be called an expensive pleasure, rather the opposite. And secondly, you always have fresh bait at your fingertips, at any time of the year or day. And this, you see, is sometimes very important.